Part 3: The Middle game
Turn Five: Again no sign of air support! (What rotten luck!) The Tyranid hordes ground forward without mercy or even heed to their own horrendous casualties. What was scary was the appearance of two huge bio-titans which could be seen far in the distance crashing through the forest. A more dangerous threat was the sight of several harridans behind them, they would be a threat next turn.
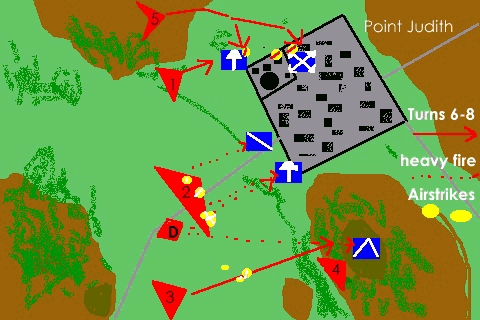
Force Harley arrived in time to provide covering fire for a slowly retreating Force Crassus. The northern Swarm (#1) had been grievously depleted pushing them off the hedgerows. However it still had teeth, as seen by an exploding Rhino, killed by the deadly weapons of a Carnifex.
The whirlwind detachment (Belarius) laid down a furious barrage on Harley’s old position. It was clear now that two full assault swarms were attempting a Southern flank “end run”. The first swarm moved across a small heavily wooded rivine in an attempt to get at the whirlwind detachment. Heavy terrain slowed up the tyranids, preventing them from assaulting Belarius. One marine squad, and a dreadnought fought alone to protect the whirlwinds. A follow-up swarm pivoted North in an attempt to roll up the Marine battle line. It was clear now that the a Tyranid tactic had been to move his main force along the southern edge, to avoid as much Marine fire power as possible. While the northern attach was just a feint. In the center, fearsome Tyranid support weapons (#2) attempted to disrupt the marine line.
Force Crassus, having pulled back a hundred meters now felt the fury of a head on assault by the tyranid swarm (#1). In the ensuing close combat, the force lost its captain, and several more stands of marines. This proved too much for even the Space Marines, and they were thrown back in confusion to deep within the town. Unlucky as they were, Crassus failed to rally and would spend the next turn broken.
The Tyranid Dominatrix (D) came into action, destroying the command land raider with its AT rolls and killing Marines with its Deathray. Blast markers were beginning to pile up on all the Marine detachments. The marine commander, looking at the advancing hordes and his own forces, judged that they may not be able to hold the line long enough to evacuate all the civilians. At this point, he ordered all rhinos to leave the battle line and assist in an overland evacuation of the civilians. This of course, left the Marines on foot against the tyranids.
Turn six: Enter the Marauders! A detachment of Marauders arrived on station and delivered their ordnance on the southern flank assault. Force Marius the assault detachment running the LZ came forward and together with Force Harley destroyed the Northern Flank threat.
The Dominatrix and the Support Swarm, focused its attention of the support detachment, destroying 2 of 3 Whirlwinds and loading them up with Blast Markers. The remnants of the first tyranid assault detachment swept up the hill and in savage fighting was finally defeated, but at the grievous lost of one of second company’s venerated dreadnoughts.
A great harridan appeared overhead swooping towards the LZ and force Marius. It disgorged a cloud of Gargoyles, that, together with a few remnants led by a hive tyrant assaulted force Graccus in a bid to attack the PZ. The force was defeated, all remaining tyranids killed, but at the loss of a squad of assault Marines and a squad of terminators.!
Turn Seven: Another Marauder detachment arrives, this time hitting the biovores which have been heaping blast markers on the Marine line. Crassus rallied and took up positions on the edge of the town. Between Crassus, Graccus, and Harley, the Marines reestablished a firing line that killed Tyranids before they could become a threat. The Tyranid support Swarm and the Dominatrix adjusted tactics and blasted Harley. This left them with one Land speeder limping to the rear. The Dominatrix, shot up yet another land raider, leaving only one left.
In the South, Force Marius, bore the brunt of another close assault while trying to cover the retreat of the Whirlwind detachment. This cost Marius dearly and it was thrown back into the town, rallying from the safety within. If the Marines can hold out only three more turns, they’ll have all the civilians evacuated.
Turn Eight. The tyranid assault spawns, were now severely depleted, (one was pretty much destroyed). Still they maneuvered over the hill where Belarius had once been and attempted to enter point Judith. Force Marius fought from building to building, using their superior firepower and firefighting ability, in combination with the very rough terrain, to keep the Tyranids off them another turn.
Force Crassus now formed the center of the Marine line, along the western edge of Judith. Despite having inflicted a number of hits on the Dominatrix. This huge creature hung back at extreme range and blasted the Marines, destroying their last Land Raider. A Reserve Swarm maneuvered to attack in the center of the line but was still out of range. In the north, remnants of the various tryranid detachments, working with gargoyles) harried force Graccus, but the marines refused to leave until a diverted rhino arrived on scene to pick up the 5 fallen comrades in terminator armor. It would be a disgrace to leave those on the battlefield.